

Your home remodel is finished, the construction crew has packed up their power tools and you are enjoying the peace and quiet with a cup of coffee. But….before you get too comfortable, undertaking a kitchen or bathroom remodel is a big investment, so here are some tips for keeping your selections and finishes in beautiful condition for you to enjoy for years to come.
After Synergy completes every home remodel, we provide our clients with a project drive containing all of the information about the project including the finishes used in the home from cabinets to appliances to tile (and everything in between) along with a care guide. Although the list below doesn’t cover every aspect, here are the items we are most frequently asked about.
Kitchen and Bathroom Cabinet Care Guide
To clean, use a damp, clean cloth. Cloth diapers and terry cloth work well.
- Don’t use a cloth that you use on dishes or countertops. It could contain detergents, residue and fibers that will harm your cabinets
- If a cleanser is necessary, use a mild, liquid, non-abrasive cleaner like Murphy’s Oil Soap. Apply the cleanser to your cleaning cloth, not directly to the cabinet
- Do not wax the cabinets, or use abrasive cleaners, powder cleaners or furniture cleaners that remove wax build-up
- Do not allow oven cleaners to touch your cabinetry
- To remove grease: mix a solution of equal parts white household vinegar and water. This solution will not leave a residue. Dampen your cleaning cloth with this solution; don’t apply the solution directly to the cabinet


Stainless Steel Range & Appliance Care Guide
Here are some frequently asked questions we receive about stainless steel appliance care:
- How do I clean the stainless steel oven frame? Remove the food soils first using a degreaser such as 409. You can also apply Kleen King or another stainless steel cleaner onto a soft cloth, apply it to the oven frame in the direction of the grain, rinse it and then dry it. Polish and protect the finish using a stainless steel polish such as Stainless Steel Magic. Reapply the Stainless Steel Magic each time a degreaser is use
- Why do I have to protect the stainless steel surface? If food soils are not removed, they may cause surface rust spots. Protecting the finish prevents surface rust and adds luster to the appearance
- What do I use to remove food soil while the surface is hot? Use a razor scraper to remove hot food immediately
- What is the best cleaner to use for wiping out light oven soil? Hot, soapy water or an all-purpose cleaner, such as 409 or Fantastik sprayed on a paper towel. In all cases, rinse after applying a cleaner
- How do I remove soil burned onto the porcelain areas of the inner door and oven cavity? Use a new detergent-filled steel wool pad, rinse it, and then dry it
- What can I use to clean the spots that remain inside the oven on the window after a Self-Clean mode? Use hot, soapy water on a non-abrasive sponge. Squeeze most of the water out before wiping. Rinse the glass and dry. For dark spots, apply Bon Ami to a damp sponge or cloth. Rub gently, rinse and dry
- What is the easiest way to clean the griddle or grill? Wash the plate in detergent with hot water. For stubborn stains, Soft Scrub® can be used
- What is the best product to use to remove heavy soil from the porcelain grates? Oven Off can be used on heavily stained grates, but before using it, mask the feet under the grates to prevent contact with the cleaner. Take the grates outside before applying the cleaner. This will prevent over-spray from contact with other surface material
- How do I remove the light gray spots that occur after boiling water or cooking vegetables? The mineral content of the water, coupled with the food being cooked, often leaves this type of spot. Usually, household vinegar rubbed on the stain removes it. Tip: Don’t forget to apply the stainless steel cleaner / polish as the final step
- What can be used to remove shadow-like stains on the burner caps? Use light abrasive powders such as Zud or Bar Keepers Friend. Tip: Remove any stains often. The longer the soiled cap is used, the more difficult it is to restore the finish


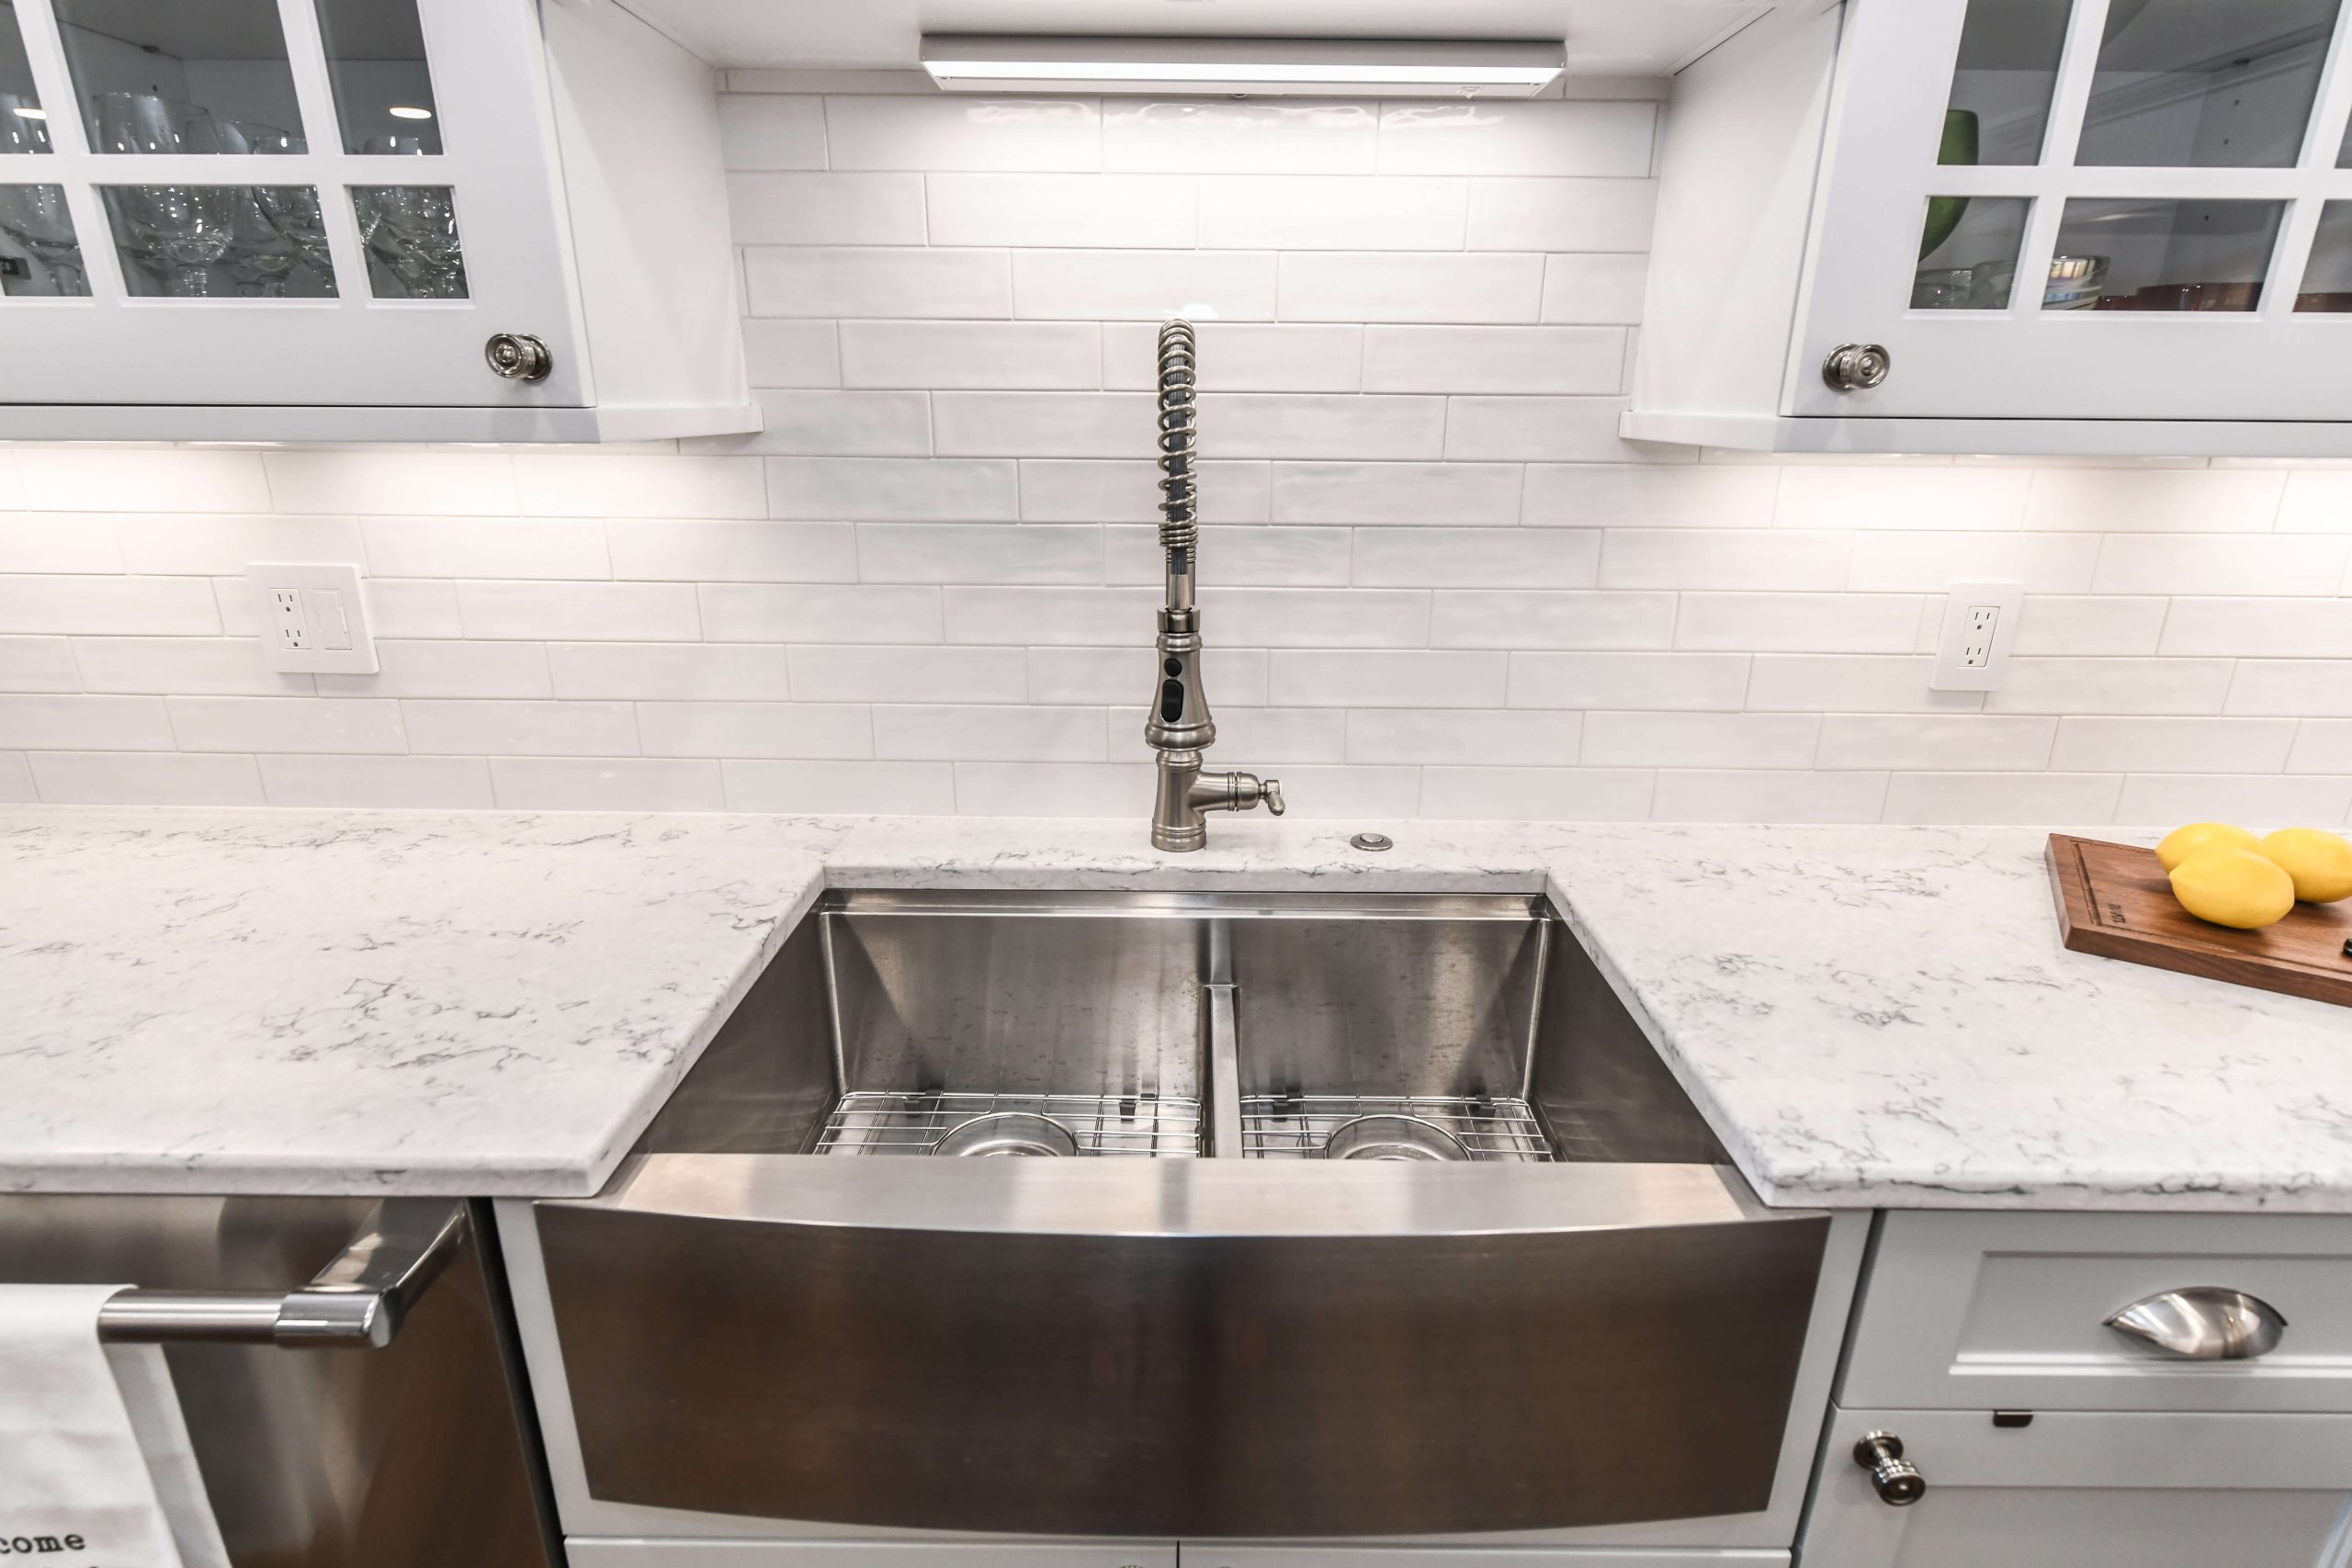
Stainless Steel Sink Care Guide
- For stains or light scratches, use a mildly aggressive cleaner such as Shiny Sinks Plus® or Flitz®
- For stubborn stains and more noticeable scratches, we suggest a more aggressive cleaner such as Bar Keeper’s Friend®, Zud®, Lawrence Right Work, Ajax®, Comet®, Maas® or Nevr-Dull®
- For extremely stubborn stains you can also try to use a Scotch-Brite Pad. When using any of these cleaners, it is critical that you rub in the direction of the grain lines of the sink, rinse completely and towel dry
- Chlorides: Today, chlorides are found in most all soap, detergents, bleaches and cleansers; chlorides can be aggressive to stainless steel. However, chlorides are very water soluble; therefore, THOROUGH RINSING of your sink after each use to remove any chloride residue and a weekly cleaning is all that is required to keep your sink looking bright and shiny
DO:
- Rinse thoroughly after each use. Run the water for a few minutes and rub the cleaned area with a clean sponge
- Towel dry after each use to prevent mineral deposits from building up on the surface of the sink
- Clean the sink once a week. For satin finish sinks be sure to rub in the direction of the satin finish lines
- Using a specified bottom grid or rinsing basket from the sink manufacturer (if available) to hold items in the sink will help “protect” the finish
DO NOT:
- Rub the sink across the satin finish lines. Scouring across the satin finish lines can damage the original sink finish
- Allow soap or other household cleansers to dry on the surface of the sink. Most brands contain chemical additives, which will affect the original finish
- Use solutions of chlorine bleach and water in the sink. Chlorides, which are found in most soaps, detergents, bleaches and cleansers, are very aggressive to stainless steel. If left on the sink too long they can cause surface pitting
- Use a steel wool pad to clean your sink. If a more abrasive product is needed, use a green Scotch Brite pad being sure to rub in the direction of the satin finish lines. Small particles of steel wool can become embedded in the surface of the sink. The steel particles will rust and will give the appearance that the sink itself is rusting
- Use unspecified rubber mats or dishpans in the sink. Leaving rubber mats or dishpans in the sink can lead to surface rust or possible pitting. If you must use mats or dishpans, remove them after each use and rinse thoroughly

Luxury Vinyl Floor Care & Maintenance
Thanks to its high durability and water resistance, luxury vinyl flooring is exceptionally easy to keep clean and looking like new. It’s the perfect solution for high traffic areas or for use on concrete slabs in rooms such as basements when hardwood is not an option. Luxury vinyl flooring beats the competition at heat, sun and water resistance, so you can live more and worry less. Use these best practices for regular care and maintenance to extend the life of your floor even further.
Basic Maintenance
When cleaning vinyl floors, use a soft bristle broom to remove loose dirt. Damp-mop as needed with clean water and a nonabrasive floor cleaner. Harsh cleaning chemicals should not be used on luxury vinyl flooring.
Best Practices for Preventing Damage
- Spills should be cleaned up immediately
- Wash the floor with nonabrasive floor cleaner
- Never push, pull or drag furniture across vinyl floors. Always lift and carry
- Heavy furniture or appliances that are not moved often should be equipped with flat, non-staining floor protectors
- Avoid using a vacuum with a beater bar
- For spot stain treatment, use a diluted bleach solution that is 1 part bleach, 10 parts water
Extra Protection
Invest in high-quality floor mats for an extra layer of protection. Place the mats at entrances and exits to collect and trap corrosive substances that can be tracked in, such as dirt, sand, oil, grit, asphalt and even driveway sealer.


Hardwood Floors
- Our flooring manufacturer recommends Bona Kemi or Basic Coatings Floor Care Products to maintain the beauty of your floor
- The Bona Hardwood Floor Mop, available through Home Depot, is also an easy and useful tool for cleaning your floor
- For spills and tracked-in dirt: clean immediately. Excess cleaner that does not evaporate immediately should be dried with a clean towel – no rinsing is necessary
- For spots caused by food, water or animals: apply floor cleaners to a clean soft cloth, rub the area to remove the stain or spot. More stubborn spots may require additional cleaning with mineral spirits, followed by the above-mentioned floor care products
- For chewing gum or candle wax: apply a sealed plastic bag filled with ice on top of the deposit, and wait until deposit becomes brittle enough to crumble off. After the deposit has been removed, clean entire area with the floor cleaners
-
DO:
- Wipe up spills immediately
- Vacuum, sweep or dust mop your hardwood floor once a week (or more if needed). The vacuum head must be brush or felt and a wand attachment is preferable
- Area rugs are recommended in front of kitchen sinks, at all pivot points and within high-traffic areas. The rugs should be made of a breathable material to prevent moisture entrapment
- Keep animal nails trimmed to prevent finish scratches
- Keep the relative humidity in your home between 35% and 55%
- Protect your floor from direct sunlight
-
DO NOT:
- Use any of the following products (or products similar in nature) on your floor: ammonia based cleaners, acrylic finishes, wax based products, detergents, bleach, polishes and oilsoaps, abrasive cleaning soaps or acidic materials such as vinegar
- Allow water to stand on your floor for any length of time – wipe up immediately
- Use rubber, foam back or plastic mats as they may trap moisture and possibly discolor your floor
- Do not use vacuums with beater bars or hard heads
-

Tile Floor
The beauty of a tiled floor is simplicity in cleaning! Simple daily cleaning is all it takes to keep tiled floors in their prime. Additional tile care includes:
- Sweep, vacuum or dust-mop floors regularly to remove gritty particles
- Gently remove any stuck-on debris with a putty knife or nylon-scouring pad
- Damp-mop with routine cleaners such as AquaKleenTM, or a similar tile & stone cleaner
- Allow drying, or if the tile’s finish is highly polished, wiping dry to avoid water spots
-
Important tips for maintaining tile floors:
- Never use abrasive cleaners. Like tracked-in dirt, they may dull a shiny finish. Carefully check the product labels to make sure they do not contain abrasives that may discolor grout
- Avoid acidic cleaners, as they may harm grout with prolonged exposure
- Place a mat outside each door and a rug just inside to collect dirt before it gets onto the floor
- It is recommended to seal light-colored grouts to reduce ongoing maintenance and porosity
-
-

Looking for more helpful home remodeling tips and resources? Read our kitchen and bathroom countertop care guide or check out our Resources Page. When it comes to remodeling your home, Synergy Design & Construction is the premier local kitchen and bath remodeler in the area and we’ve got you covered!
Ready to start a conversation about your home remodel? Find out more about us here.
